Descriptions
Sensor enclosures as standard are produced using stainless steel. 316 stainless steel is an optional material for the enclosure. The enclosures are protection class IP65 however they can be the upgraded option of IP66/NEMA 4X.
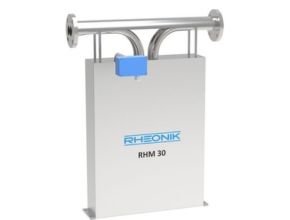
The RHM 30 is available with a wide choice of material options to suit benign and aggressive applications. Heavy-duty variants meet high-pressure and high-temperature needs while providing the highest accuracy performance.
- Range: 10 kg/min up to 900 kg/min
- Pressure: up to 405 bar (5874 psi)
- Temperature: -196°C (-321°F) up to +350°C (662°F)
- Accuracy: 0.1 % of rate
- Materials: SS 316L / SS 316Ti, Alloy C22 – 2.4602, Super Duplex – 1.4410, Tantalum – UNS R05200
- Process Connection: 1 ¼” up to 3″
- Robust torsion oscillator design.
- Has a measuring range of between 7.5kg/min to 750kg/min.
- Highly accurate with mass flow uncertainty being 0.15%.
Pressure and temperature RHM 30
The RHM30 from Rheonik is a precise Coriolis flow meter that can be used in a variety of mass flow applications. The high-pressure ratings of up to 798 bar and vast fluid temperature range of -196°C to 350°C mean it can be used in extreme or routine applications.
Benefits & Features RHM 30 Medium Coriolis Flow Meter
- High pressure rating of 798 bar with a high fluid temperature rating of -196°C and 350°C.
- Reliable measurements with mass flow uncertainty being 0.15%, repeatability being lower than 0.05% and density uncertainty being 0.5%.
- Accurate measuring range of between 7.5 and 750 kg/min.
- Stainless steel sensor enclosure as standard with the option of 316 stainless steel.
- Epoxy coated aluminium terminal box is available as standard but this can also be constructed from 316 stainless steel.
- The enclosure is protection class IP65 but IP66/NEMA4X protection is an option.
- The wetted materials that can be used are 316Ti, Tantalum, Superduplex, and Alloy C22. Seals are made from PTFE.
- Approval from ATEX/IECEx for use in Zones 0, 1, and 2, and North American approval for use in Class 1, Div.1, and groups ABCD. Approved for use on marine vessels by the American Bureau of Shipping.
- Sensors are hydro-tested and have an accompanying calibration certificate.
Uncertainties and flow measurements turn down
All uncertainty statements refer to reference conditions – the mass flow of water, 18 – 24 °C, 1 – 3 bar in a standard temperature, pressure, and material configuration sensor. The sensor can be used to measure gas – uncertainty values for gas equal to the liquid value plus 0.3 %. Reference conditions for gas are mass flow of natural gas, 18 – 24 °C, 35 to 100 bar in a standard temperature, pressure, and material configuration sensor.
The turn-down capability from the Qnom of the flow sensor is mainly driven by its zero-point stability. At the very low end of the measuring range, the uncertainty (u) is dominated by the zero point stability. The zero point stability of a standard sensor is 0.000036 kg/min (0.000079 lbs/min). The zero stability of a Gold Line sensor is 0.000019 kg/min (0.000042 lbs/min).
- For flow Q ? zero stability / (calibration uncertainty/100) u = calibration uncertainty
- For flow Q < zero stability / (calibration uncertainty/100) u = (zero stability/Q) x 100
Uncertainties from environmental and process conditions
- If sensors are not zeroed at operating conditions, minor additional uncertainties can arise from elevated temperatures and pressures: ±0.00308 % of maximum flow per °C and ±0.0208 % of maximum flow per bar.
- Process temperature effect on density: additional uncertainty of ±0.000641 g/cm³ per °C difference from calibration temperature with standard density calibration and of ±0.000073 g/cm³ per °C difference from calibration temperature with enhanced density calibration. This effect can be mitigated by a simple field density adjustment at operating conditions.
- Process pressure effect on mass flow: The effect of pressure on flow measurement is 0.001 % of the rate per bar. Compensation is possible by pressure sensor input (analog input or digital write) or manual value entry into the transmitter.
- Process pressure effect on density: The effect of pressure on density measurement is 0.00012 g/cc per bar. Compensation is possible by pressure sensor input (analog input or digital write) or manual value entry into the transmitter.
General Specifications
| Nominal Flow (Q???)* | 800 kg/min (1763.7 lb/min) |
| Maximum Flow (Q???)* | 900 kg/min (1984.2 lb/min) |
| Typical Minimum Flow (Q???)* | 10 kg/min (22.1 lb/min) |
| Serial Tube / Single Path | Flow rates Qmax, Qnom, and Qmin for “serial” sensors will be 50% of the above-listed parallel/dual path version. |
| Operating Temperature | Fluid temperature range options cover applications from -196°C to +350°C (-320°F to +662°F). For integral transmitter versions please refer to the transmitter datasheet |
| Ambient Temperature | -50 °C to +80 °C (-60 °F to +180 °F) (standard) |
| Pressure Ratings | Up to 462 bar / 6701 psi – dependent upon material |
| Electrical Connection Sensor | M20 x 1.5 standard cable entry for JM, SM terminal box versions |
| w/o Integral Transmitter | Optional entries available : ½” NPT or M25 x 1.5 (only for SM) or ¾” NPT (only for SM) |
| Max. cable length to remote RHE transmitter 100 m / 328 ft | |
| Sensor Enclosure Materials | Stainless steel 304 (standard), SS 316 (optional) |
| Coated aluminum terminal box, SS 316 terminal box (optional) | |
| Enclosure Type | Protection class IP66, NEMA 4X (standard), IP66/67, NEMA 4X/6 (optional) |
| Wetted Materials | 1.4571 (SS 316Ti), 1.4410 (SuperDuplex), 2.4602 (Alloy C22) – standard |
| Tantalum – Consult Factory | |
| Seal material (manifold construction): PTFE | |
| Additional/customer-specific materials available upon request | |
| Process Connections | Nearly any – the Rheonik AnyPipeFit Commitment. Consult the factory for types/sizes not listed in this data sheet on the Mechanical Construction pages |
| Pressure Rating Compliance | Europe – PED: Module A2, Module B3.1+C2 |
| Canada – CRN: Canadian Registration Number | |
| Certifications and Approvals | ATEX / IECEx Approvals for Zone 0, 1, 2 (details see page 13) |
| North American Approvals Class I, Div. 1, 2, Gr. A, B, C, D, Zone 0, 1, 2 | |
| MID custody transfer approval (OIML R117) | |
| American Bureau of Shipping (ABS) Product Type Approval for use on marine vessels | |
| Testing and Inspection | All sensors are hydro-tested, calibrated, and supplied with a traceable calibration certificate. Customized calibration and testing services are available |
| Project Documentation and QA, Services | Rheonik offers a full set of services for large and complex engineering projects. |
| Typical services offered are, but not limited to: | |
| •Certificates of origin and conformity, mill certificates | |
| •Data books including WPAR, WQS, NDT, test & quality plans, functional testing, calibration procedures, customized packing, factory acceptance, etc. | |
| •Painting to project specification | |
| •Start up and commissioning services on/offshore | |
| Options | Enclosure heating for high-temperature applications |
| Cleaning for oxygen service, … | |
| For more consult the factory |
- At Q??? pressure drop across a parallel tube sensor will be approximately 0.75 bar (10.1 psi) for H?0. Sensors can be operated at higher flow rates up to Q??? but the pressure drop will be higher. Typical Minimum Flow Q??? is the recommended lowest flow rate for an accurate measurement. Sensors will measure flow rates lower than Q??? but uncertainty will increase beyond 1 % of rate.
The flow rate specifications above relate to standard pressure, parallel tube, and manifold sensor versions. Models with higher pressure ratings have increased wall thickness and will have higher pressure drops.
Source: https://www.rheonik.com/products/coriolis-sensor/rhm-30/dimensions/?redirected=true
Read More Articles :
- Silver Instument Radar liquid level sensor Level Meter
- KIMO INSTRUMENT HD 110 Thermo-hygrometer
- pctflow Instruments FA 510 / FA 515
- KIMO INSTRUMENT Si-TI3 Infrared thermometer
- KIMO INSTRUMENT KIRAY 200 Infrared Thermometer


